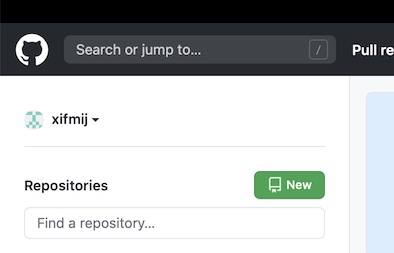
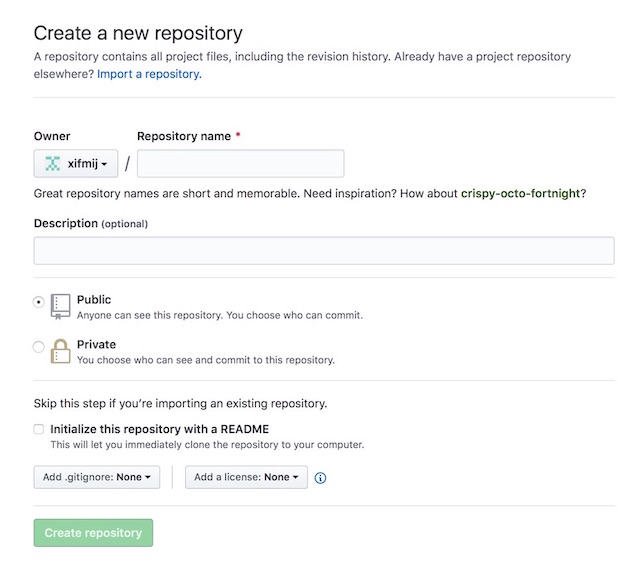
CSCI 221 Fall 2020LAB 01: logisticsAttempt before the 9/9 lecture In this lab we will practice the steps involved in writing and running C code, and then submitting that work. We’ll be working in a Unix-like environment, typing a variety of Unix commands, to get this work done. For those of you on campus, we’ll spend a brief moment logging into a Linux machine to try some commands there. Then, for the rest of the lab, you can either use that machine or the environment you’ve set up on your own computer. In order to complete this lab from off campus, your machine must be set up according to this installation guide. You will be submitting work through your GitHub account. This lab shows you how to use Git, at least enough to do the work in this class. Using Git all semester, you will clone programming assignments, edit the code, and then commit and push those edits to a Git account repository, one for each assignment. The lab is in four parts. In Part 0, if on campus, you’ll learn to remotely log in to a “dumpling” Linux machine and navigate its system using Unix commands. In Part 1, optionally you’ll try the same on your own machine. In Part 2, you’ll use one of those two machines to test out your Git account, create your first Git code “repository.” In Part 3, you’ll learn how to clone some starting C code that we’ve provided, change it, and submit the changes. To participate in this lab, you should already have a GitHub account and shared its username with us. Your machine also needs some command-line tools (Terminal on Macs; e.g. Powershell or GitBash on Windows) or else a secure-shell client (available as the command In all the work below, you’ll need to use your Reed Unix user name and your GitHub account name. The former is made up of the same letters that form the start of your Reed email; mine is Part 0: work on a dumplingNote: this part can only be completed by students that are on campus. Those of you that are off-campus can watch what I do live. The first thing you’ll want to do is bring up the command-line console on your machine. In your future as a computer programmer or researcher, you will likely be given access to a remote server or a cloud system, one that can only be accessed over a network login (e.g. a research machine at a university, a build system within a tech firm, an AWS or Azure cloud instance). Knowing how to remotely log in and being comfortable navigating that system will be critical for that. It’s also common to create virtual machines as part of a software or research project to execute software or a software system in a “sandboxed” environment, possibly to emulate the activity of a networked collection of computers. In all these scenarios, the use of Unix tools is typically necessary. SSH to a dumpling This command runs the “secure shell” tool. It allows you to open up a Unix shell console, securely, on the computer you chose (it uses cryptographic information exchange protocols to protect the information you type, information sent from your computer to it). That computer will challenge you to prove that you are you by asking for your password. Once you’ve entered that password, you’ll see a few other system messages (possibly one asking whether you really want to do this; you do want to, so answer “yes”) and then you’ll be put into that remote system, and it will await your commands. Make a folder This prints the working folder (in old Unix terminology, a “directory”) within the command console. It will be the full path of your file home, the series of nested folders where your files live on the system. When in Unix, the commands that you type take effect (typically) within the working folder—the folder that you are currently working within. If you then type this will list the contents of the home folder. You’ll likely see some folders here, though this depends on how Reed set up your account. The command Let’s modify the file system to create a folder for doing your course work here. We’ll create that folder and then change which folder we’re working within. Type the command to create a folder named The Unix command for changing the console to work in a different folder is and then type If you get an error anywhere above, talk to one of us and we can help you determine the correct command. It could be that you are mistyping, or maybe you put spaces in the folder name to make the Unix command tricky. In any case we can help you get it right. Anyway, congratulations, you are changing a networked filesystem by remote access to a machine that you do not own! We’ll continue to do this for the remainder of the lab work. FYI: logging out and this will take you off that remote system. When you are ready to begin working again, just run the Part 1: work on your own machineNow, optionally, let’s do the same work on your own computer. Exit out of and this will drop you out of that remote login, and put you back to the state of working within your own machine, and within its own filesystem. Type in a similar set of commands that you typed on That second command If you were able to complete Part 0 and also to complete the Part 1 commands just above, then you have a choice: you can continue to work on your machine, or you can log back on to Part 2: try the git toolsOkay, now let’s practice editing files and working with Git’s tools. Configure git on this remote system but using your actual info, not Rory’s. This should set up Git on this machine, tying your dumpling account to your GitHub account. Now, on your actual machine (not on On GitHub, create a repository. If you have just logged into GitHub, you should see a left column with the heading Repositories along with a small green button labelled New. You should then see a screen labelled Create a new repository. Here’s that green button
and here’s that creation screen
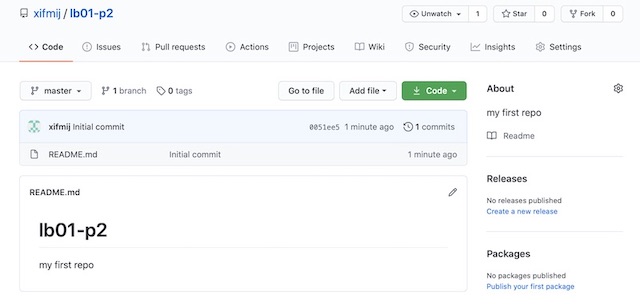
Enter the repository name
You’ve just created a project folder named Clone the repository onto the dumpling Now we are going to essentially download that new repository folder so that you can edit and add to it on the dumpling, rather than through the web. We do that using the Unix command to do that, but first we need to find out the right thing to put in place of the
You’ll want to use the text in the rectangle for the using your GitHub username instead of Success! Now if you enter you should see a file named you’ll see its text contents were properly downloaded. Change the repository’s content
Let’s do Step 1. Enter the command This will start the nano editor. This is a terminal-based editor and so, rather than bringing up a separate editing window on your computer (like Microsoft Windows might), it instead brings up the editor within the small confines of the console. You should see something like this
At the top is a line indicating that you are in the nano editor, at the bottom is a command key reference, and then most of the middle lines are the actual contents of that text file. Move the cursor around, say, to the last line and just start typing words into the last line of the file. Type whatever you like. When you are done, you can “Write Out” those changes to the file with by holding the control key on the keyboard and then hitting the letter O. In other words, type control-o. This will prompt for the name of the file, but you can just hit return and it will save the changes to the same-named file. Having done that, type control-x to exit nano. Enter and you should see that the file’s contents have changed. Now on to Step 2. Enter the command and that will create a new empty text file named and you’ll see the new file and then see its contents. Stage these changes for a repo update Before doing that, we need to stage all our updates, registering which files with changes are part of the staged update. You can get a full sense of what’s changed in this local area with the command It’ll be useful to enter this command with each of our steps below, just to see how locally Git is tracking what we are asking it to do with our changes. Enter the commands The two With this command, we’ve officially, within the Git tools, made a full update, a series of related changes to the contents, of our dumpling’s version of the repository. Push those changes Before doing so, first just check the GitHub page in the browser and notice that it still contains the original stuff. Enter the command Sparks will fly, you’ll have to type your GitHub password again, you’ll see some console output, there will be a slight pause as the machine connects to the GitHb web site, and then the push will be done! Go back to the website and you should see that the remote repository on GitHub changes with your updates. Congrats. Part 3: completing a GitClassroom assignmentI’ve constructed a repository named There will be two additional steps: Getting the assignment repository https://classroom.github.com/a/zo8-d_1q Click on this, or cut and paste the URL into your browser, and follow the instructions on that loaded page to “Accept the assignment.” Along the way, GitClassroom will ask you to identify yourself within my “GitClassroom roster.”
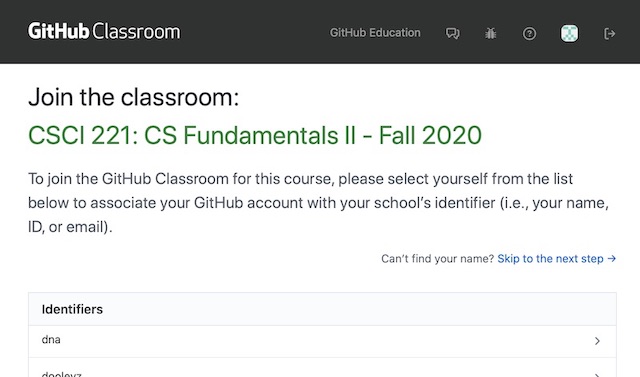
The roster is just a list of everyone’s Reed usernames and should include yours. Scroll through that list and find your Reed username, and clicking that will link your GitHub account to the classroom list. Finally, and as a result, you will now have a repository that you can clone and update. It should be sitting at a URL like Note that, even though it is your repository, it lives within the ReedCS2-F20 classroom. Let’s clone this repository. You’ll want to back out of the Part 2 folder. Within the dumpling, enter the commands The last two can help you verify that you are now in your dumpling user’s Once ypu are in This will download a folder named If you Lastly, you want to set up a new branch for you to work. You do that with the command Here, in this command, Editing, compiling, and running Here’s again the command for editing a file, say Here’s the command for compiling that C code, to create an executable named And here’s the command you enter for running that new executable: And that’s pretty much it! Submitting your completed work just like you did for Part 2. And then finally you’ll want to push the changes up to GitHub, and specifically for the branch you created (up above with and you will have then submitted your completed assignment for this lab. A Final NoteWe’ve covered a lot of ground here, but with little explanation, I hope you are okay with that, as performing all these actions, and seeing the results, was probably helpful in learning what these steps are about. Nonetheless, you should definitely feel free to ask us questions about any of these steps. My plan tomorrow is to show you these steps again, though instead to demonstrate how you should hand in your work for Homework 01. |